
Add Order
Table of Contents
1. Features
When an order doesn't come in automatically from an e-commerce platform — for phone orders, offline transactions, or manual entries — you can create one here. After filling in the receiver info and items and submitting, the system checks inventory automatically, reserves stock, and the order then enters the shipping flow just like a platform-imported order.
Quick jump: Basic Info | Receiver & Options | Items & Submit
Fields marked with * are required
1.1 Basic Info
| Field | How to fill | Notes |
|---|---|---|
| *Order Number | Enter the order number; click the suggest button beside it to have the system generate one | The system checks for duplicates in real time; a duplicate blocks submission |
| Other Number | Enter a secondary reference number (e.g. platform order number) for internal reconciliation | Optional; At most 255 characters; shorten longer references before saving |
| *Shipping Type | Select a shipping type from the list | If the option is missing, set up shipping types under "Data Management" first |
| *Sales Channel | Select the order's source channel from the list | If the option is missing, click the link in the dropdown to add one |
| Warehouse | Select the shipping warehouse | Only appears when you have multiple warehouses; a single warehouse is filled in automatically |
1.2 Receiver & Options
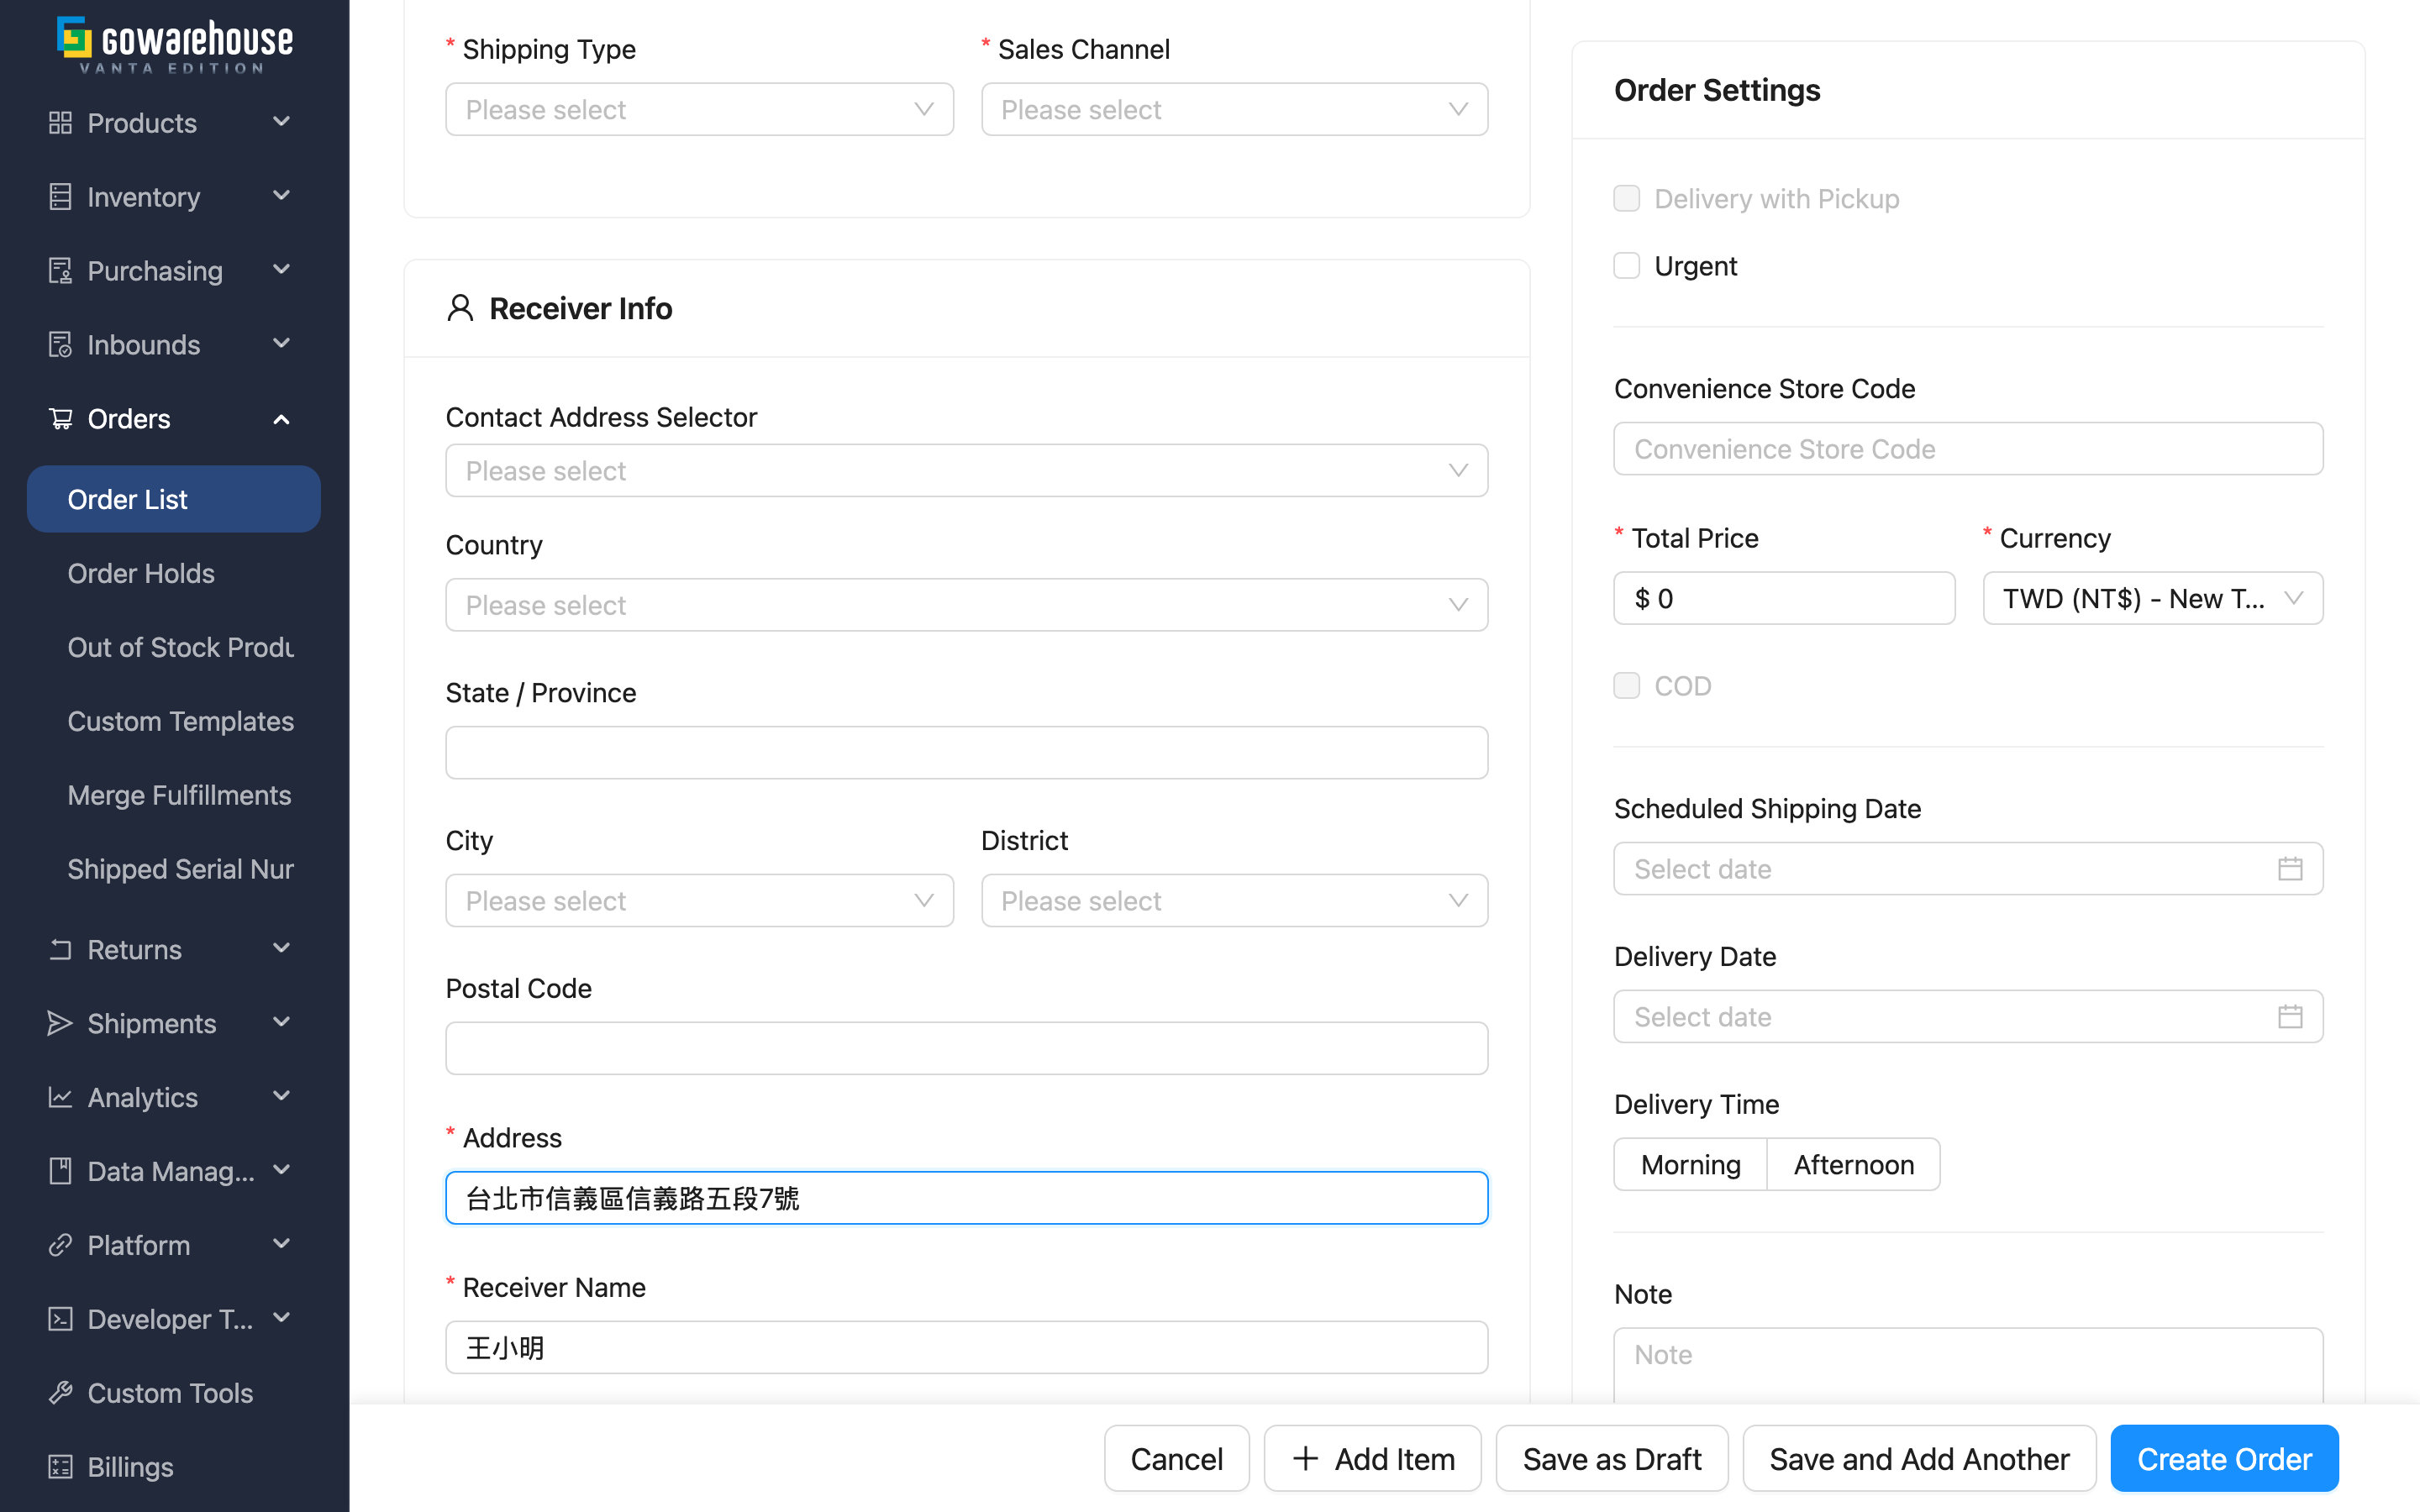
The receiver information section records who the package goes to and where:
Fields marked with * are required
| Field | How to fill |
|---|---|
| *Receiver Name | Enter the receiver's name |
| *Phone | Enter the receiver's contact phone; convenience-store pickup methods (SF store pickup excepted) require a mobile number formatted as 10 digits starting with 09 |
| Address | Enter the full delivery address; can be combined with the city and postal code fields above. Required for home-delivery shipping types, optional for convenience-store pickup |
| Receiver's email, optional | |
| Convenience Store Code | Enter the pickup store's code; required for convenience-store pickup shipping types, optional for all others |
Address and Convenience Store Code sit one after the other in the receiver section and are always both visible; only whether they are required changes, switching live with the Shipping Type selected above, and values you already typed are never cleared when you change the shipping type.
When you pick an SF Express shipping type (home delivery and store pickup alike), Postal Code becomes required as well: SF treats the postal code as a mandatory field of its own when it issues the waybill, so without it no tracking number comes back, however complete the address is. For Taiwan addresses it fills in automatically once you have selected City and District.
The options section on the right sets amounts and shipping conditions:
| Field | How to fill |
|---|---|
| *Total Price | Enter the order amount; defaults to 0 if left blank |
| *Currency | Select the currency; the merchant's default currency is filled in |
| COD | Check for cash on delivery; once checked, "*COD Amount" is required and cannot exceed the order amount |
| Urgent | Check to mark as urgent, prompting the warehouse to prioritize |
| Scheduled Shipping Date | Specify the desired ship date |
| Delivery Date / Delivery Time | The customer's specified delivery date and time slot |
1.3 Items & Submit
The items section requires at least one product before you can submit. Click "Add Item" to add items one by one, choose a product, enter its "Expected Quantity", and optionally fill in batch, expiration date, and other details.
Once complete, choose one of three submit options:
| Button | Result |
|---|---|
| Create Order | Creates a formal order; the system immediately checks inventory and enters the shipping flow, then jumps to the order details |
| Save as Draft | Saves as a draft order, processed later, with inventory not yet checked (good for awaiting payment confirmation or pre-orders) |
| Save and Add Another | Creates it and clears the form to stay on this page, convenient for creating multiple in a row |
Supply unit price
When selling through a channel and recording both the consumer selling price and your supply price, enable "Supply unit price" in the item column settings. Enter the agreed supply amount per item. For example, if your cost is 400, you supply the platform at 650, and it sells at 900, enter 650 as the supply unit price and 900 as Unit Price. The supply price does not change the system-calculated inventory cost.
Leave the supply price blank when unknown; zero means free supply. The allowed range is 0–99,999,999.99 with two decimal places, in the order currency. Use the source transaction's agreed tax-inclusive or tax-exclusive basis; the system neither converts tax nor deducts platform fees. Entering a supply price does not automatically change Total Price or COD Amount.
1.4 Invoice details
This optional advanced section is collapsed by default. Select Invoice details to expand it. Collapsing the section preserves entered values; validation errors automatically expand it for correction.
Enter the buyer and invoice delivery instructions for this order. The buyer may differ from the recipient, so recipient details are not copied automatically. Leave the fields blank when instructions have not been provided.
Carrier type, Carrier ID, and Donation code appear only when the merchant’s organization country is Taiwan, regardless of the recipient country, currency, or interface language. For other or unspecified countries, the tax field is labelled Buyer tax ID. Hiding fields does not clear saved values.
| Field | How to fill it in | Notes |
|---|---|---|
| Buyer type | Select “Individual” or “Business” | Business buyers must provide Buyer name / company name and Buyer tax ID |
| Buyer name / company name, Buyer tax ID | Enter the name and tax ID confirmed by the buyer | Leading zeros are preserved; the recipient name is not used as a substitute |
| Buyer address, Invoice email, Buyer phone | Enter the buyer’s invoice address and contact details | These can differ from the delivery address and recipient’s contact details |
| Carrier type, Carrier ID | Enter a pair supported by your invoicing service | Fill in or clear both fields together; do not also enter Donation code |
| Donation code | Enter the designated code to donate the invoice | Clear both carrier fields before switching to donation |
After saving, review the information on the order’s “Invoices” tab. These fields record instructions only; they do not issue an invoice. Changing the instructions does not alter issued invoices.
2. FAQ
2.1 FAQ
▪ It says the order number is a duplicate and won't submit?
Each order number must be unique. The system checks as you type; if it shows a duplicate, change the number, or click the suggest button to have the system generate a unique one.
▪ What's the difference between "Create Order" and "Save as Draft"?
"Create Order" immediately checks inventory and starts the shipping flow; "Save as Draft" saves as a draft order without checking inventory, suitable when payment isn't confirmed yet or a pre-order needs delayed shipping. A draft only starts processing after it's converted to a formal order from the list later.
▪ What if I can't find the shipping type or sales channel to select?
That means the option isn't set up yet. Set up shipping types under "Data Management" first; for sales channels, click the link in the dropdown to add one, then return to this page and refresh the dropdown.
▪ I checked cash on delivery but can't submit?
After checking "COD", "COD Amount" becomes required and cannot exceed "Total Price". Confirm the amounts are correct.
▪ For a convenience-store pickup order, do I fill the address or the store code?
When you pick a convenience-store pickup shipping type (7-ELEVEN, FamilyMart, Hi-Life, Myship B2C, SF store pickup, and the like), "Convenience Store Code" becomes required and "Address" becomes optional — the parcel goes to a store, so there is no delivery address. Home delivery and every other shipping type are the opposite: address required, store code optional. Both fields stay on screen the whole time, and you may fill in both.
▪ Why does Postal Code become required for SF Express?
SF treats the recipient's postal code as a mandatory field of its own when it issues the waybill: leave it empty and the request is rejected and no tracking number comes back, however complete the address is. So whenever you pick SF Express (including SF store pickup at 7-ELEVEN or FamilyMart), the form asks you to fill in Postal Code first. For Taiwan addresses it fills in automatically once you select City and District.
▪ Why won't a convenience-store pickup order accept a landline?
Once the parcel reaches the store the carrier texts the receiver to come and collect it. A landline cannot receive that text, so the parcel sits at the store until it expires and is returned. That is why "Phone" must be a 10-digit mobile number starting with 09 whenever you pick 7-ELEVEN, FamilyMart, Hi-Life, Myship B2C or a similar convenience-store pickup method; a landline is rejected right under the field and the order cannot be submitted. Even when the form is bypassed (platform imports, API-created orders), the same check runs again on save. SF store pickup does not notify by text and is exempt.
Type the digits as one unbroken run: 0912-345-678 and +886912345678 are both rejected — what gets saved has to be a format the carrier accepts. Among home-delivery shipping types only PAYUNi T-Cat (including chilled and frozen) demands a 09 mobile as well; the form gives no warning up front, but saving with a landline fails. Every other home-delivery shipping type checks no format at all, so a landline is still fine there.
▪ Do I have to add items to create an order?
Yes. An order must contain at least one product before it can be submitted, otherwise the system prompts that products cannot be empty.
2.2 Notices
⚠️ Important reminders
- The order number, once created, is the order's identifier and must stay unique
- A formally created order reserves inventory immediately; if you don't want to occupy stock yet, save it as a draft instead
💡 Tip: When creating multiple orders in a row, use "Save and Add Another" to skip returning to the list and re-entering the add page each time.
3. Related Features
| Feature | Description | Link |
|---|---|---|
| Order List | View and manage all orders | Go |
| Order Details | View the full content of the order you just created | Go |
| Edit Order | Modify the content of an unshipped order | Go |