
Create EC Account
Table of Contents
1. Feature Overview
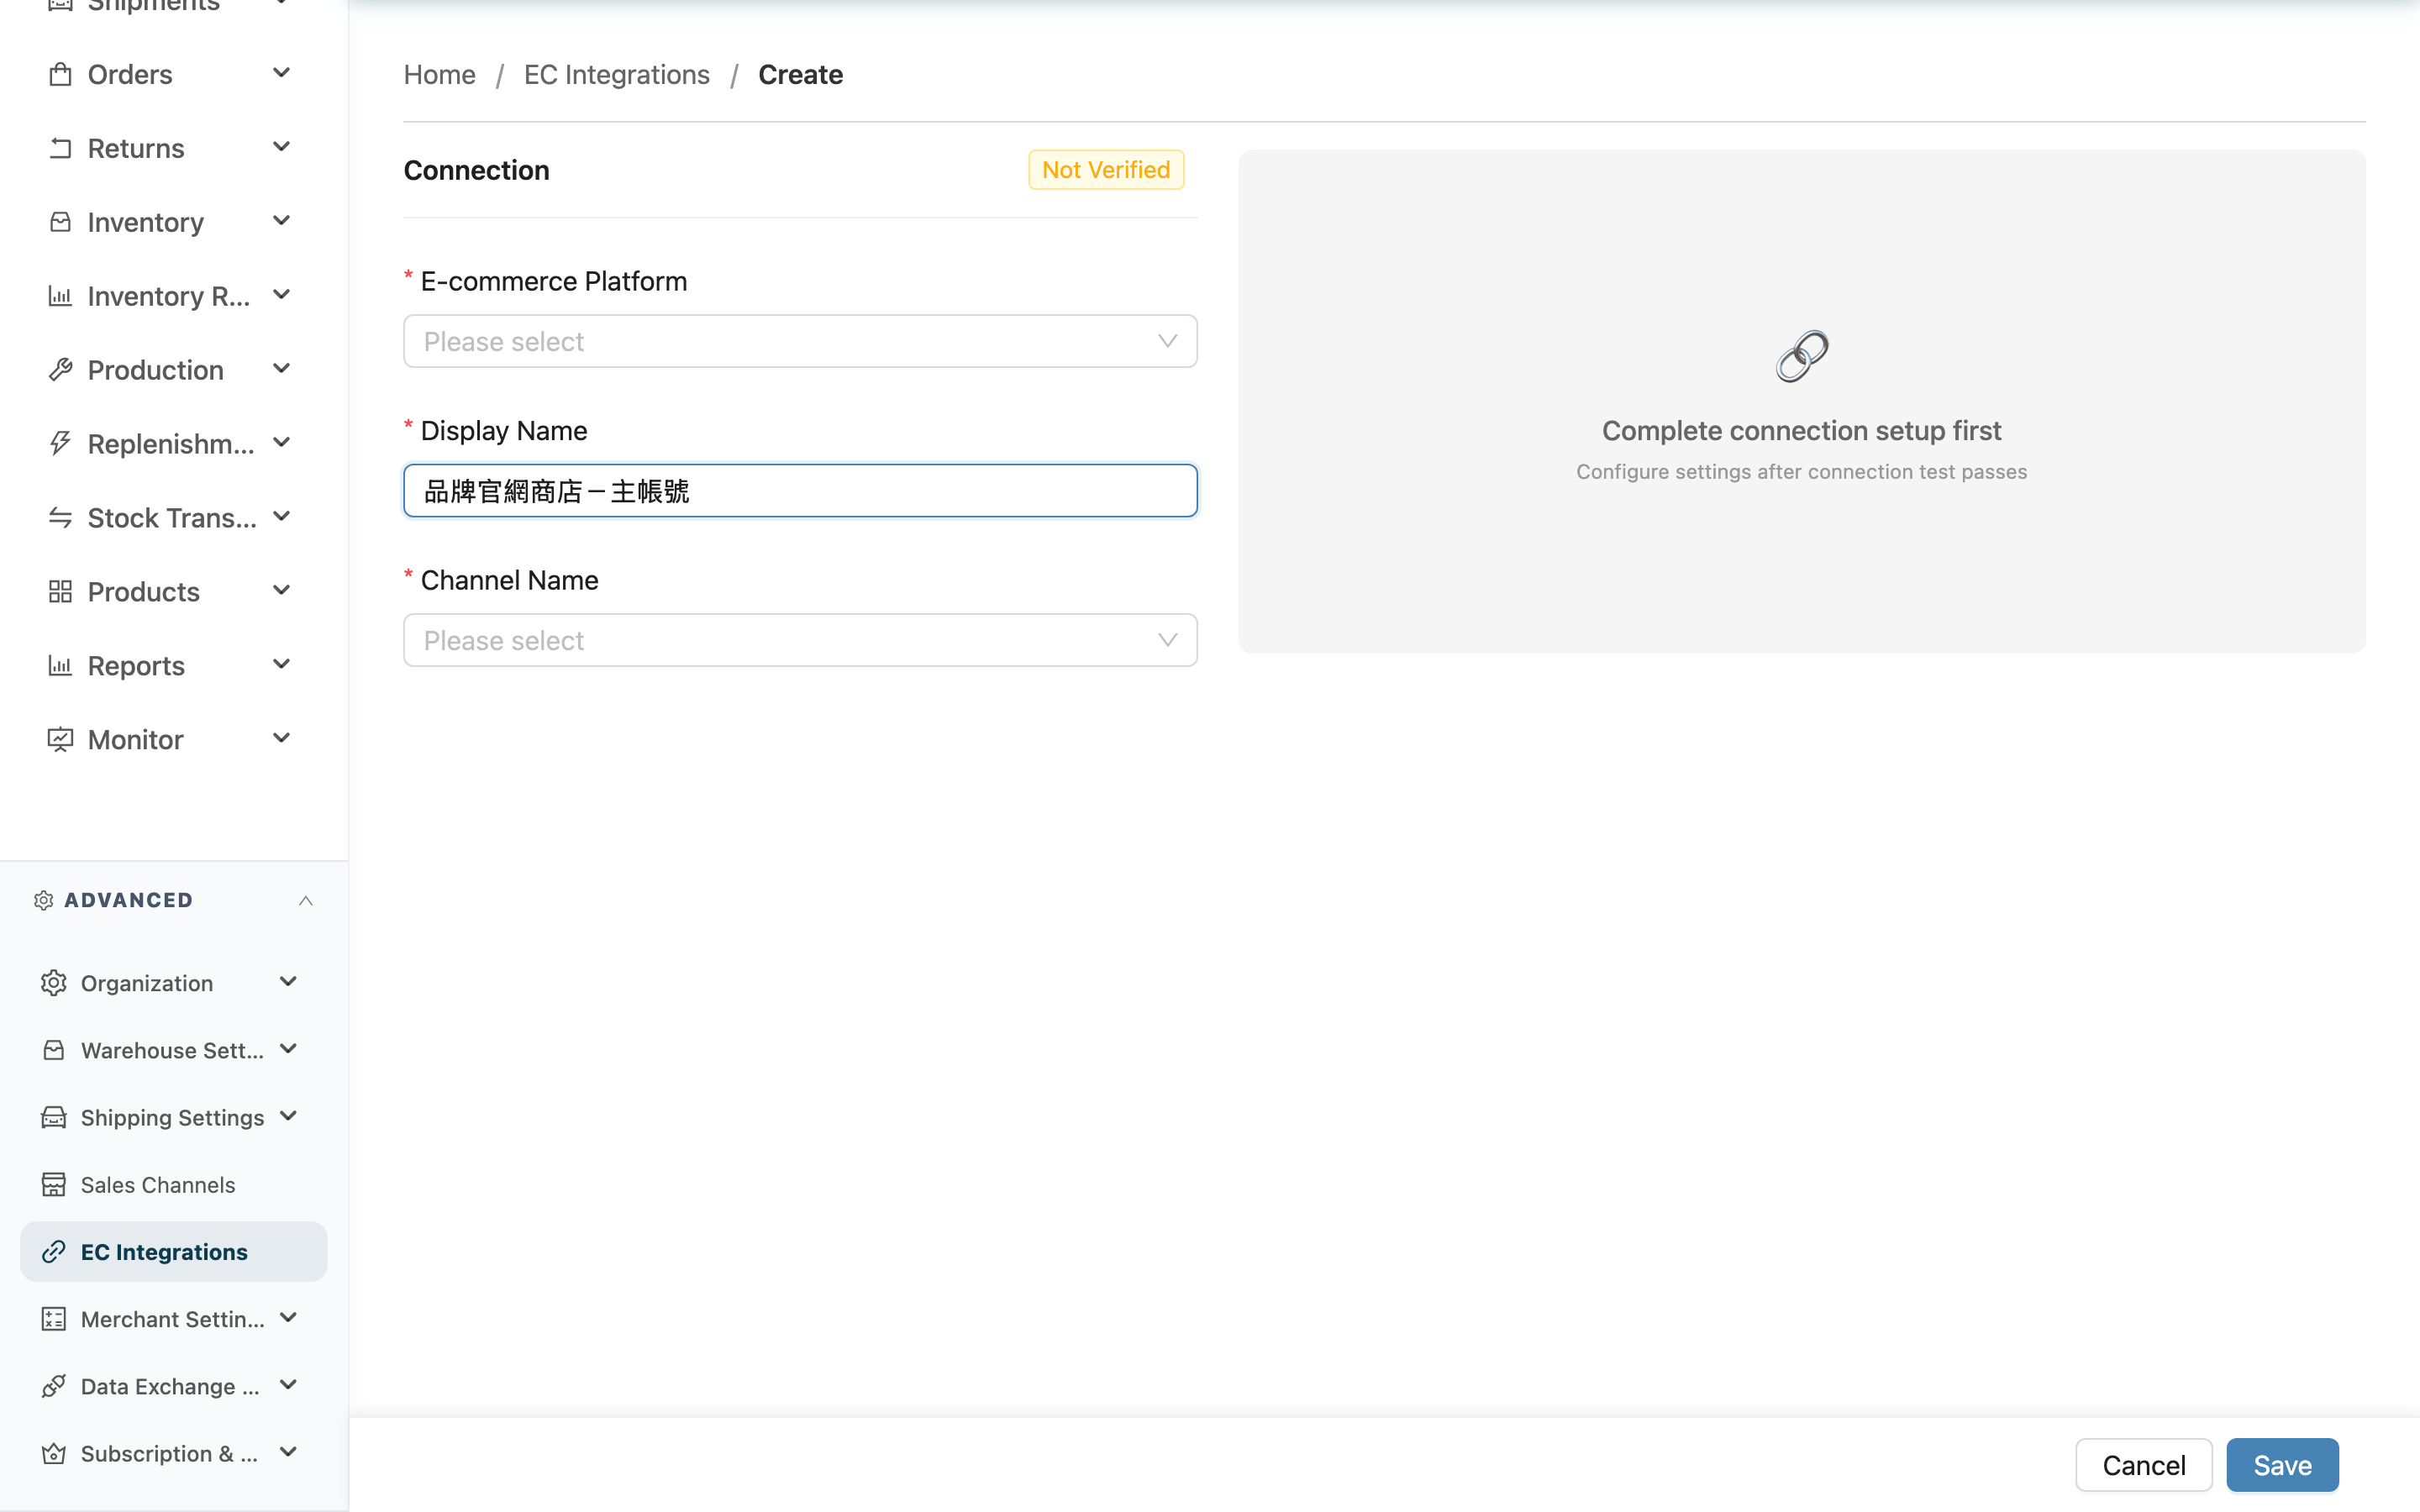
This page lets you create an e-commerce platform account for a specific merchant, connecting platforms like Shopee, Shopify, and MOMO into the warehouse system. Once connected, the platform's orders are automatically fetched in as fulfillment work, and warehouse stock can be pushed back to the platform based on your settings. The creation flow is a single line: pick the merchant, fill in the connection details, test the connection or authorize, unlock the function settings on the right once connected, then save.
Quick Jump: Pick the Merchant | Connection Info (left column) | Function Settings (right column) | Field Reference
1.1 Pick the Merchant First
When you open the create page, the system first asks you to choose which merchant to create the account for. An e-commerce account must belong to a merchant, and reference data such as sales channels loads based on the merchant you pick. The connection form below only appears after a merchant is selected.
1.2 Connection Info (left column)
The left column holds the connection settings needed to link a platform, in three steps:
▸ Pick platform, enter name, bind channel
First pick the E-commerce Platform (one of 17 connectable platforms), enter the Display Name, then bind a Channel Name. All three are required. The sales channel can only be one that belongs to this merchant; if the merchant has no channel yet, the dropdown shows "No sales channels created" with a link to go set one up.
▸ Fill in connection info (credentials)
After you pick a platform, the left column shows different credential fields for that platform (for example API key, token, store login, store domain). Fill them in using the data from the platform's own admin panel.
▸ Test connection / Authorize & connect
After entering credentials, establish the connection using the method that matches the platform type:
- API-key platforms: A Test Connection button appears in the left column. Clicking it saves the account first, then verifies the credentials against the platform. On success the connection status becomes Connected and the button switches to "Connection test succeeded".
- Authorization platforms (Shopee / Shopify / Liteshop): An Authorize & Connect button appears in the left column. Clicking it leaves the warehouse system and redirects to the platform's authorization page; once you approve on the platform and return, the account is treated as connected — no manual credential testing needed.
There are three connection statuses: Not Verified (just created, not yet tested), Connected (connection succeeded), Disconnected (connection failed).
1.3 Function Settings (right column)
The right column holds the order-fetch and stock-push settings. Before the connection test or authorization passes, the right column is locked and shows "Complete connection setup first". Once connected, the right column unlocks and you can configure:
- Fetch Orders: When on, the system automatically fetches platform orders into the warehouse based on your schedule. When on, you must set at least one fetch schedule.
- Realtime New Order Fetch: Shown for Shopee accounts only, on by default. When on, the platform notifying us of a new order schedules an extra fetch and the order reaches the system in about 5 minutes, so it does not wait for the next fetch slot. When off, new orders only arrive during the fetch slots you set.
- Inbound Push: When on, stock is pushed back to the platform once inbound completes. Combine it with push percentage to control what percentage to push.
- Dependent settings need their master switch on before you can edit them: "Fetch Schedule" and "Realtime New Order Fetch" follow "Fetch Orders", and "Push Percentage" follows "Inbound Push". While a master switch is off, the fields under it are greyed out and cannot be clicked, and a note beside them says which switch to turn on first. On a new account "Inbound Push" is off by default, so "Push Percentage" is greyed out as soon as the page opens; turn the switch on to edit it.
- Waybill Layout: Shown for Momo, Mo+ and Shopline accounts only, A4 by default. With thermal, the system splits the platform's A4 waybill into a left and a right section, each printed as its own page so a label printer can print it directly; it affects home-delivery waybills only (Momo: T-Cat / Pelican / HCT / Kerry TJ; Mo+: T-Cat / HCT; Shopline: T-Cat only, including cash on delivery) — convenience-store pickup labels stay A4 and are not split, and so do Shopline's HCT and cross-border labels. Carriers may reject and return a split waybill, so confirm with the platform and the carrier before switching.
- Shipping Type Mappings: Shown only for some supported platforms. Maps the platform's shipping options to warehouse-side shipping types so the system knows which shipping to use when shipping out. For a Cyberbiz account, the warehouse-side dropdown lists Cyberbiz's integrated shipping types (for example Cyberbiz T-Cat and Cyberbiz HCT) on top of the merchant's own shipping types; accounts on other platforms are unchanged and list only the merchant's own shipping types. Cyberbiz shipping method codes can be edited by the merchant in their back office, and once a code changes, incoming orders raise an "Unmapped Shipping Type" notification; map the new code to the correct Cyberbiz integrated shipping type here and the orders resume automatic conversion, tracking-number requests, and label printing — no need to ask the merchant to restore the old code.
1.4 Field Reference
Fields marked with * are required
| Field | How to fill | Notes |
|---|---|---|
| *E-commerce Platform | Pick an e-commerce platform to connect from the list | Cannot be changed after creation; a wrong choice means deleting and recreating |
| *Display Name | Enter a name to identify this account inside the warehouse system, e.g. "Shopee-main" | When a merchant has multiple platform accounts, this name tells them apart |
| *Channel Name | Pick a sales channel that belongs to this merchant | Only channels under this merchant are available; if missing, create one first at Create Sales Channel |
| Connection info (credentials) | Fill in the fields shown for the chosen platform, e.g. API key, token, store login, store domain | Authorization platforms obtain credentials via Authorize & Connect instead of manual entry |
| Fetch Orders | When on, automatically fetches platform orders | Can only be set after the connection passes |
| Fetch Schedule | Choose the times to fetch orders from the slot list, up to 3 | Required when "Fetch Orders" is on; pick at least one |
| Realtime New Order Fetch | Decides whether new Shopee orders are fetched about 5 minutes after the platform notifies us, on by default | Shown for Shopee accounts only; when off, new orders only arrive during the fetch slots, and status sync (cancellation / shipment) for existing orders is unaffected |
| Waybill Layout | Choose whether waybills print as A4 or thermal, A4 by default | Shown for Momo, Mo+ and Shopline accounts only; thermal splits the A4 waybill into a left and a right section, each on its own page. It affects home delivery only (Momo: T-Cat / Pelican / HCT / Kerry TJ; Mo+: T-Cat / HCT; Shopline: T-Cat only, including cash on delivery) — convenience-store labels and Shopline's HCT and cross-border labels stay A4. Carriers may reject and return a split waybill, so confirm with the platform and the carrier before switching |
| Inbound Push | When on, pushes stock back to the platform once inbound completes | Can only be set after the connection passes |
| Push Percentage | Enter the stock percentage to push to this platform, range 0–100, default 100 | A merchant's platforms totalling over 100% carries oversell risk |
| Shipping Type Mappings | Map the platform's shipping options to warehouse-side shipping types | Shown only for some platforms; each mapping must pick a warehouse-side shipping type. A Cyberbiz account also offers Cyberbiz's integrated shipping types; accounts on other platforms list no platform integrated shipping types |
When done, click Save at the bottom of the page. After a successful save you return to the EC Account List.
Ragic does not offer "Inbound Push" or "Push Percentage" settings. Inbound imports use "Fetch inbounds" and a separate "Inbound fetch times". While "Fetch inbounds" is off, "Inbound fetch times" is greyed out and cannot be edited, and since "Fetch inbounds" is off by default on a new account, it starts out greyed as soon as the page opens; turn the switch on to edit it. For the first connection, enter either an order sheet path or an inbound sheet path. An inbound-only account does not require an order sheet. Once connected, configure the import template, line-item subtable, import condition, and receipt write-back. After saving, check the Ragic inbound integration on the detail page.
For inbound-only use, turn off order fetching. The order sheet path, fetch schedule, import template, import conditions, shipment writeback, and shipping code mappings are hidden. Turning order fetching back on restores these fields; saving while disabled preserves the existing order settings. Retesting an existing account saves the current inbound switch and settings together. If inbound fetching is turned off, it stays off even when you also change the API key or source sheet. After switching inbound sheets, matching record IDs on the new sheet can still be imported (document numbers must remain unique). Existing inbounds write back to their original sheet using the writeback fields saved at import. Closing receipt again in the same receiving cycle preserves the first completion time; reopening and completing creates a new writeback cycle. If a populated item lacks its SKU or an explicit date is invalid, the entire inbound is rejected. Correct the source data using the sync log.
Custom attribute defaults apply even without a mapped source column; an existing source value takes priority. Yes/no attributes accept Y/N or 1/0, and numbers and dates are converted according to the attribute type. Invalid values reject the entire inbound; correct them using the sync log, then fetch again. If Ragic rejects a receipt writeback or its service fails temporarily, the system retains the retry instead of marking the writeback as successful.
2. FAQ
Quick Jump: Common Questions | Important Notes
2.1 Common Questions
▪ Why are the function settings on the right greyed out and unclickable?
The function settings on the right unlock only after the connection on the left passes. Before that, the screen shows "Complete connection setup first". First fill in the credentials in the left column and complete Test connection or Authorize; once the connection status becomes Connected, the right side can be configured for fetching and pushing.
▪ I can't find the channel I want to bind in the sales channel dropdown — what now?
The sales channel dropdown only lists channels under the merchant you currently selected. If that merchant has no channel yet, the dropdown shows "No sales channels created". Create a channel for this merchant first at Create Sales Channel, then come back to create the e-commerce account.
▪ I picked the wrong platform — can I change it after creating?
No. The e-commerce platform (E-commerce Platform) cannot be changed after creation; this field is locked on the edit page. If you picked the wrong platform, delete this account and create a new one.
▪ How do I connect platforms like Shopee and Shopify?
Shopee, Shopify, and Liteshop are authorization platforms that use the Authorize & Connect button — no manual credential testing needed. Clicking it redirects you to the platform's authorization page; once you approve on the platform and return, the account is treated as connected.
▪ Test connection failed and I see a platform error message — what does it mean?
A failed test means the platform rejected the credentials you entered when the system verified them, usually because the credentials are wrong or lack sufficient permissions. If the message includes the platform's raw response (e.g. unauthorized, no permission), follow that message back to the platform's admin panel to confirm the API key or token is correct and has the right read/write permissions, fix it, then test again. On failure the status becomes Disconnected.
▪ I turned on Fetch Orders but can't save?
When "Fetch Orders" is on, "Fetch Schedule" must have at least one slot selected, otherwise you can't save. Pick 1 to 3 fetch times from the slot list.
▪ I set fetch times, but Shopee orders still arrive outside those slots?
Shopee accounts have "Realtime New Order Fetch" on by default, so a new-order notification from the platform schedules an extra fetch and the order reaches the system in about 5 minutes instead of waiting for your slots. Those 5 minutes are deliberate: Shopee has not assigned the shipping details the moment an order is placed, and fetching any earlier would leave the recipient phone as Shopee's redacted placeholder instead of the delivery contact number Shopee issues along with the shipping details. If you want new orders to arrive only during the slots you set, turn this switch off. Status sync for existing orders (cancellation, shipment) still runs as usual.
▪ What should the push percentage be?
The push percentage defaults to 100, meaning all available stock is pushed to this platform. If a merchant sells across multiple platforms, you can lower the percentage to split the allocation. Note: across all of a merchant's "connected and push-enabled" platforms, if the percentages total at or above 100%, the system shows an oversell-risk warning after saving.
2.2 Important Notes
⚠️ Key Reminders
- E-commerce Platform cannot be changed after creation; a wrong choice means deleting and recreating the account, so confirm the platform before creating.
- An e-commerce account must bind a sales channel that belongs to the merchant; without a channel it cannot be created.
- Across a merchant's connected, push-enabled platforms, keep the total push percentage under 100% to avoid oversell risk.
💡 Tip: Authorization platforms (Shopee / Shopify / Liteshop) leave the system and redirect to the platform's authorization page; after authorizing they return automatically, so do not close the window during the process.
3. Related Features
| Feature | Description | Link |
|---|---|---|
| Create Sales Channel | Create the sales channel that an e-commerce account must bind to | Go |
| EC Account List | View and manage the merchant's e-commerce accounts | Go |
| EC Account Detail | View a single e-commerce account's connection and settings status | Go |
| Shipping Types | Set up warehouse-side shipping types for shipping code mappings | Go |