
Import Return Orders
Table of Contents
1. Features
When a merchant returns many items at once, or you need to create several return orders together, instead of typing each one in "New" you can open the import dialog from the return list with "Import" and upload one Excel template covering the whole batch. The system creates or updates return orders from the template, saving the time of entering them one by one.
Quick Jump: Dialog Fields | Steps | Template Columns | Multiple Items per Order | Override Existing Data
1.1 Dialog Fields
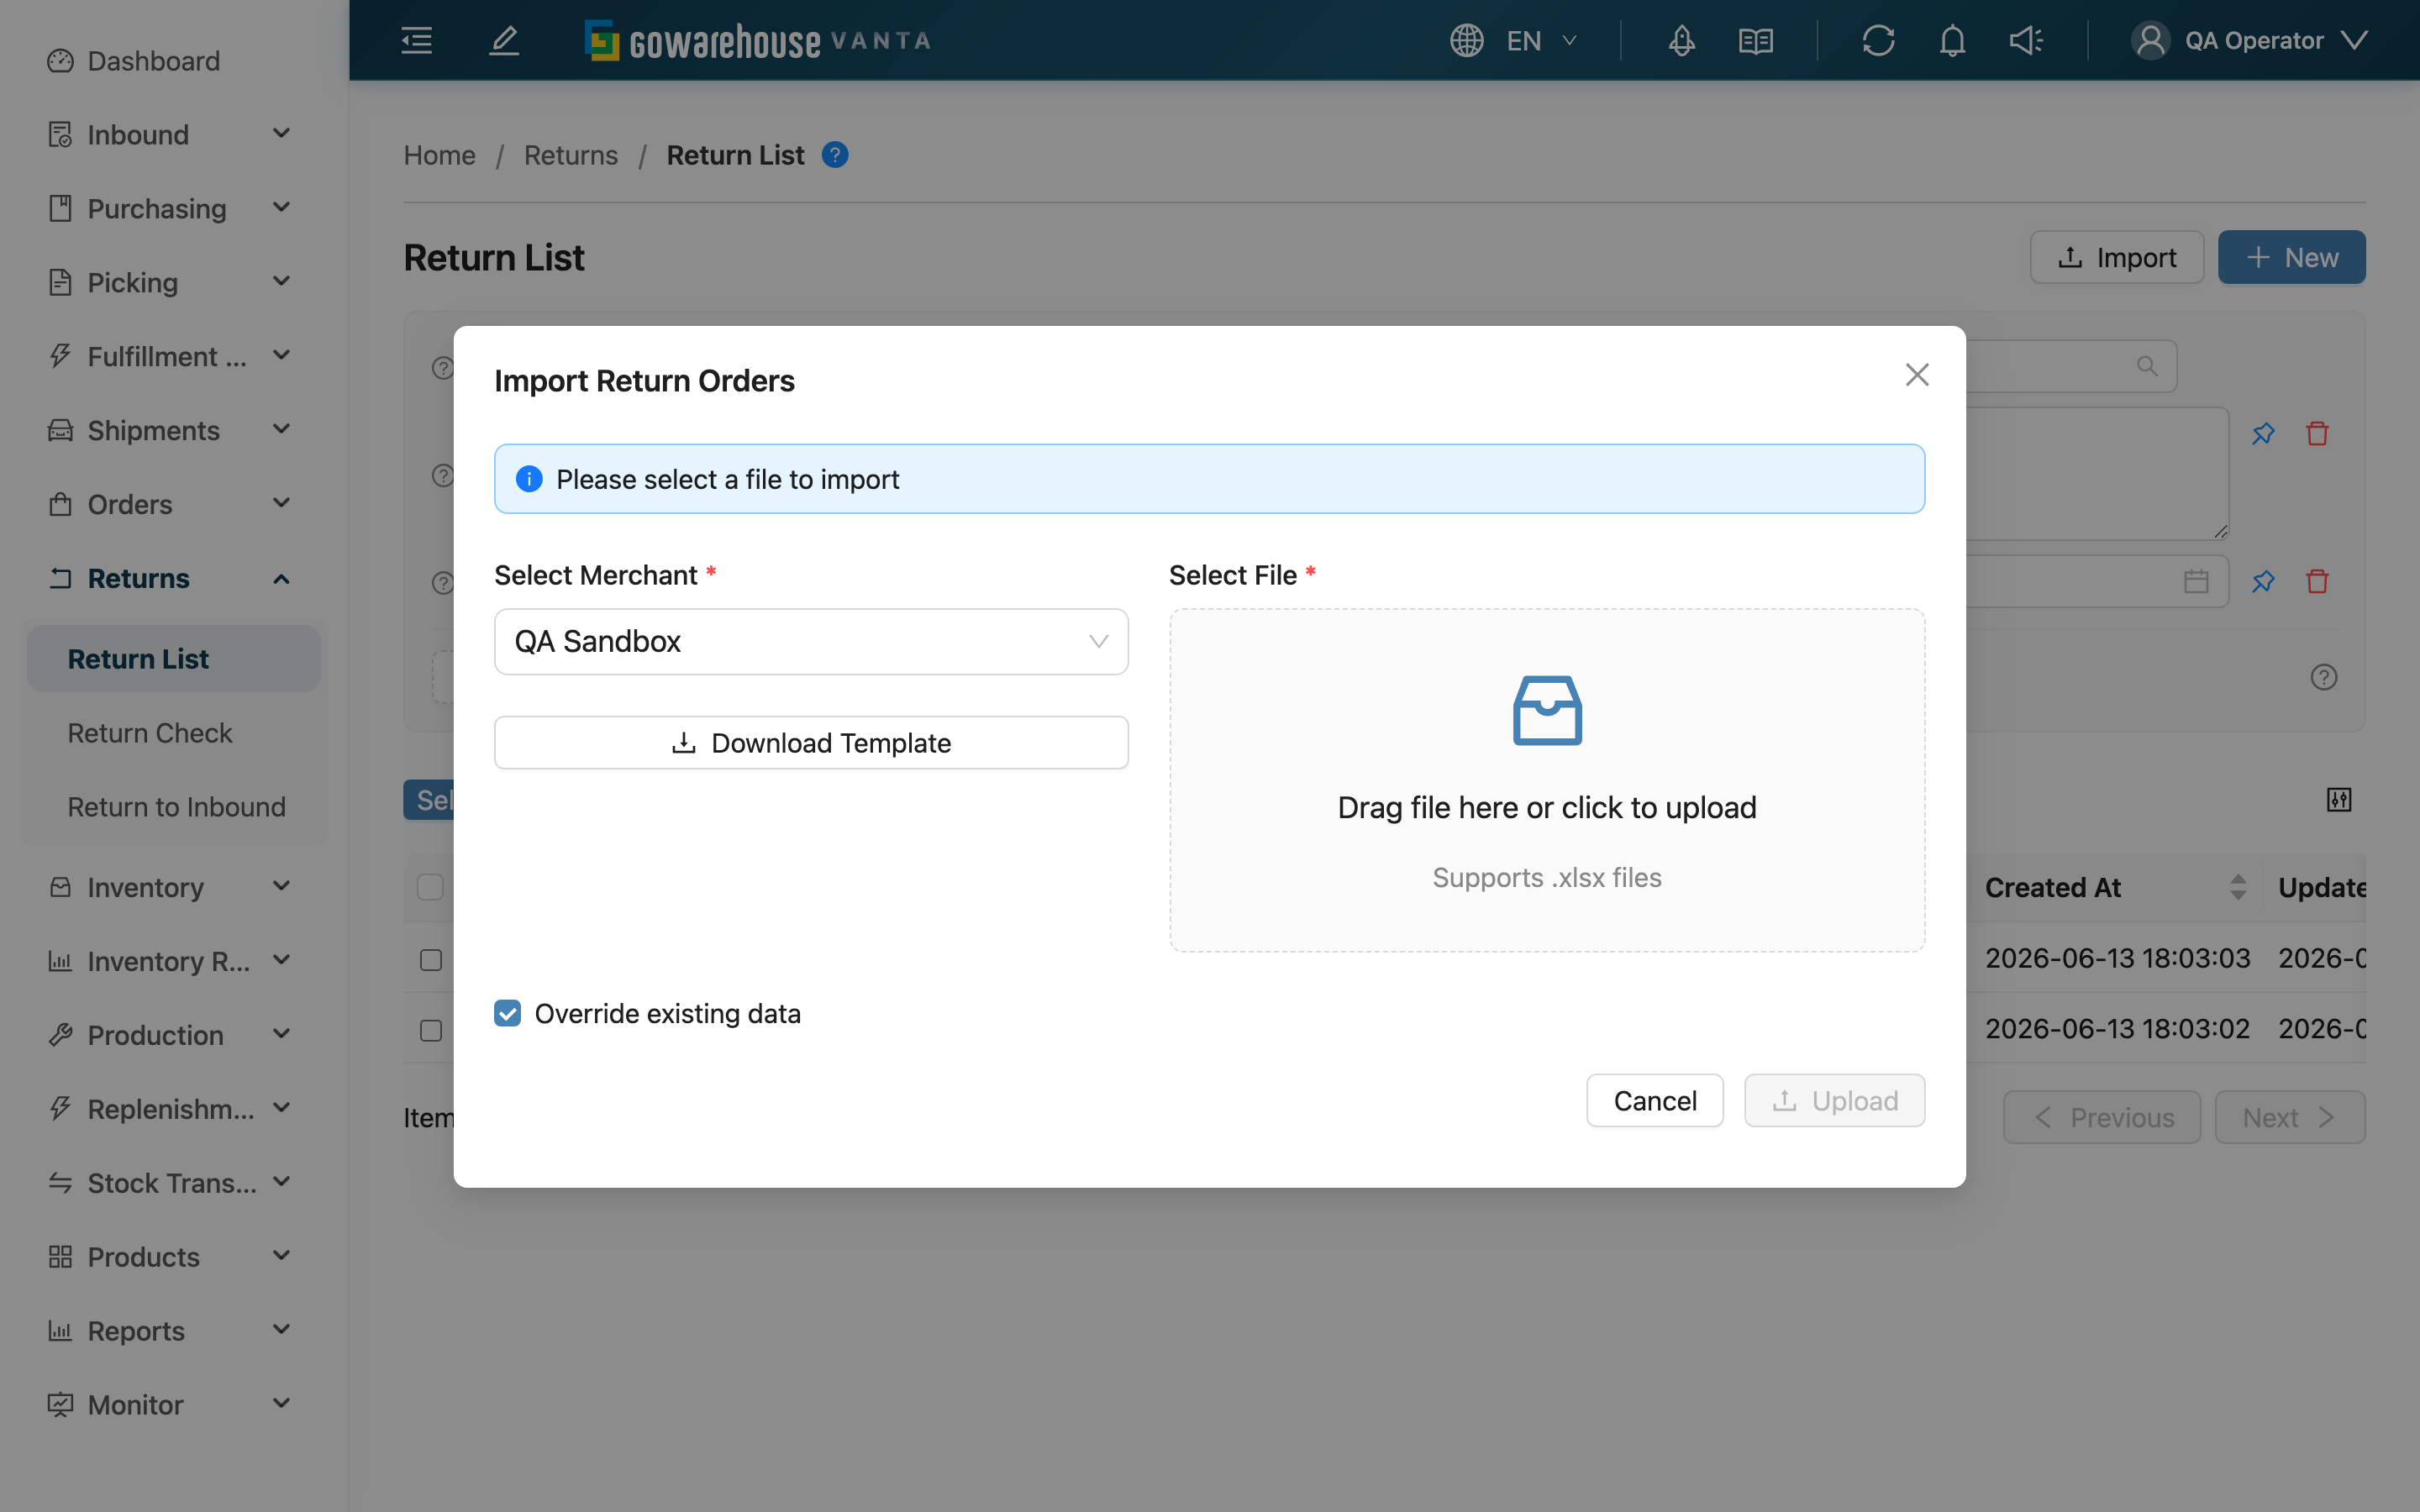
Clicking "Import" on the return list opens the "Import Return Orders" dialog. From top to bottom, the fields and buttons are below. Fields marked * are required.
| Field / Button | How to fill in | Notes |
|---|---|---|
| Import Template | Optional. If you created an import template earlier, pick one to apply its column mapping | Left blank, the system's default column mapping is used. Choose a template before downloading so the template header matches it |
| *Select Merchant | Choose the merchant these return orders belong to | Imported orders are created under this merchant; single-merchant plans do not show this field |
| Download Template | Download the Excel template and fill in return data following it | You must select a merchant first; the template brings out that merchant's product custom-attribute columns |
| *Select File | Click to pick a file, or drag it into the upload area | Only .xlsx / .xls, up to 10MB per file, one file at a time |
| Override existing data | Checked by default; decides whether to overwrite an existing return order with the same name | See Override Existing Data |
| Upload | After confirming merchant, file and checkbox, click to submit the import | The "Cancel" next to it closes the dialog and discards this import |
1.2 Steps
▸ Download the template
- Click "Import" at the top right of the return list to open the dialog
- Select the merchant in "Select Merchant" first
- Click "Download Template" and open the downloaded template in Excel
▸ Fill in the template
- The first row is the column headers — do not change it
- Fill in data from the second row; see Template Columns for how to fill each one
- One return order can span multiple rows of items; see Multiple Items per Order
- Save and keep the .xlsx format
▸ Upload and import
- Back in the "Import" dialog, confirm the same merchant is selected
- Click "Select File" to pick the file, or drag it into the upload area
- Adjust the "Override existing data" checkbox as needed (uncheck to create, keep checked to update)
- Click "Upload" to submit
▸ Check the result
- After importing, this run's progress and success / failure results are recorded under "Data Exchange Logs" → "Import Logs"
- Find this import record there to review the success and failure details; if any rows failed, the record lists the reason row by row
- The return list does not refresh automatically — go back to the list and refresh manually to see the newly created orders
⚠️ The import runs in two stages: the system first checks the whole file, and if any row is invalid (a missing required field, a bad format, a product / order / inventory type that cannot be found, a duplicate return order name, and so on), the entire file is aborted and not one return order is created — the record lists every problem row at once, so fix them all and re-upload the whole file. Only once every row passes does the system create the return orders one at a time; at that stage a single order can still fail while the rest are created.
1.3 Template Columns
The names below are the column headers in the Excel template. Fields marked * are required, and their columns must not be deleted from the template. Even when a cell may be left empty on some rows (for example the return order number on the following item rows of the same order), the column itself must stay; if the whole column is removed, the system reports a missing required field on row 1 and none of the file is imported. The one exception is a column that already has a default value in your import template and that template is selected under "Import Template" when you import — then the column may be left out of the file and the system fills in the template's default. A template that exists but is not selected for this import counts for nothing, and the column is still reported as a missing required field.
Order-level columns (filled on the first row of each return order):
| Column | How to fill in | Notes |
|---|---|---|
| *Return Order Number | The identifying name of this return order | Must be unique within the merchant; it is the key for identifying and overwriting an existing order |
| Other Number | A secondary reference number (e.g. from the merchant's own system) | Optional |
| Order Number | The original order number it corresponds to | Optional; if filled, it must be an order that already exists for this merchant, otherwise none of the file is imported |
| Note | A note for the whole return order | Optional |
Item-level columns (filled on every item row):
| Column | How to fill in | Notes |
|---|---|---|
| *Product SKU | The product's SKU | Must be a product already created for this merchant, otherwise none of the file is imported |
| *Inventory Type | An inventory type code enabled for this merchant | Required; leaving it empty, or using a code the merchant has not enabled, aborts the whole file |
| *Quantity | The quantity expected to be returned for this item | Required, must be a number greater than 0, otherwise none of the file is imported |
| Expiration Date | The product's expiry date, format YYYY-MM-DD | Optional, can be added during checking; once filled it must be a date (use YYYY-MM-DD) — text such as "N/A" is rejected during validation and none of the file is imported. ⚠️ Never write "01/02/2026" or "01-02-2026" here: the day is always read first, so it silently stores 1 February 2026 without reporting an error |
| Batch | The product's batch number | Optional, can be added during checking |
| Item Note | A note for this item | Optional |
📌 Note: If the merchant has product custom attributes configured, the template automatically adds the matching columns. These custom-attribute columns are never required when importing return orders and can be left blank.
1.4 Multiple Items per Order
When one return order has several products, use the "Return Order Number" column to group them:
- The first row of each new return order fills in "Return Order Number" and that order's order-level columns
- For the following item rows of the same order, leave "Return Order Number" blank — the system groups them under the previous order
For example: the first row holds the return order name plus the first product, the next few rows hold only products with the name left blank, forming one order with several items; the next order starts again from the row that has a name. The very first data row of the template must have a name, otherwise the system cannot tell which order it belongs to and simply drops that row's products. Note that the import record then still shows status "completed" with a failure count of 0 — only one extra line appears in the error details, which is easy to miss. A later return order whose first row is missing its name is quieter still: there is no error detail at all, and those product rows are merged into the previous return order. Neither case is counted as a failure, so check yourself that every new order's first row carries a name.
1.5 Override Existing Data
"Override existing data" is checked by default. The system matches existing return orders by "Return Order Number" and decides the action based on the checkbox and the existing order's status:
| Checkbox state | When a return order with the same name exists | When to use |
|---|---|---|
| Unchecked | Fails, and none of the file is imported | When creating return orders and avoiding overwriting existing ones |
| Checked (default) | If the order is in the editable "Pending" status, it is updated (its items are replaced with the template's); otherwise it fails and none of the file is imported | When updating existing return orders |
Change details:
- Preconditions: the overwritten return order must be in "Pending" status; orders that have started checking (after "Partial Received") cannot be overwritten.
- Side effects: overwriting clears the order's existing items and replaces the whole set with the template's items.
- Reversibility: the content before the overwrite cannot be restored automatically.
2. FAQ
Quick Jump: FAQ | Important Notes
2.1 FAQ
▪ Where do I download the template, and why is the download button disabled?
On the return list, click "Import" to open the dialog and select "Select Merchant" first — only then can you click "Download Template". Without a merchant selected the download button stays disabled, because the template needs to bring out that merchant's product custom-attribute columns.
▪ One return order has many products — how do I fill the Excel?
Put the return order name and order-level columns on the first row, then leave "Return Order Number" blank on the following item rows of the same order. See Multiple Items per Order.
▪ Where do I see successes and failures after importing?
Go to "Data Exchange Logs" → "Import Logs" to view this import's results and failure details. The return list does not refresh automatically — go back to the list and refresh manually.
▪ What does "Override existing data" mean? Will it overwrite an order that already started checking?
It decides whether to overwrite an existing return order with the same name. It only overwrites orders still in "Pending" status; orders that have started checking are not overwritten and the system fails them outright. See Override Existing Data for the full rules.
▪ Is "Order Number" required?
No. This column links the return order back to the original order for traceability. You can leave it blank; but if filled, it must be an order number that already exists for this merchant, otherwise it fails with an "order not found" error and none of the file is imported.
▪ Are batch and expiry date required?
No. A return order records what is "expected to be returned"; the batch and expiry can be left blank at this stage and filled with the actual batch and expiry during checking.
▪ Are there file format or size limits?
Only .xlsx / .xls, up to 10MB per file, one file at a time.
▪ What if a product / order / inventory type is not found?
It means the value in the template does not exist for this merchant. Use the table below to create the data or correct the value, then re-import:
| Object not found | What to do |
|---|---|
| Product | Check the SKU spelling; go to "Products" → "Product List" to confirm the product exists, and create it first if not |
| Order | Confirm that "Order Number" is an order number that already exists for this merchant |
| Inventory type | Go to "Merchant Settings" → "Merchant Inventory Types" to confirm the merchant's enabled code, then fill it in |
▪ What are the common reasons an import fails?
They fall into four categories:
| Category | Common situation | What to do |
|---|---|---|
| Required missing | Missing SKU, inventory type or quantity (whole file aborted); the very first data row of the file has no return order name (that row is dropped; the status still shows completed with 0 failures) | Fill in the SKU, inventory type and quantity on every row; the first row of each new order must have a name |
| Format error | Quantity is 0 or not a number, or the expiration date is not a recognizable date | Change the quantity to a number greater than 0; write the expiration date as YYYY-MM-DD |
| Data not found | Product / order / inventory type not found, or the merchant has no default warehouse | Create the matching data or correct the value first; if the merchant has no default warehouse, set one up — see the notes below |
| Data conflict | A return order with the same name exists but "Override existing data" is unchecked, or the order is no longer in "Pending" status so it cannot be overwritten | To update, check override and confirm the order is still editable; to create, use a non-duplicate return order name |
2.2 Important Notes
⚠️ Important
- "Override existing data" is checked by default — remember to uncheck it when creating return orders, to avoid overwriting an existing order with the same name.
- Overwriting clears all existing items and replaces the whole set with the template's items, and cannot be undone automatically.
- Only return orders in "Pending" status can be overwritten; orders that have started checking are not overwritten.
- Before importing, the merchant must have a default warehouse set, otherwise creating the return order fails.
💡 Tips:
- Select the merchant before downloading the template so it brings out that merchant's product custom-attribute columns.
- Create products under "Products" → "Product List" before importing to greatly reduce "product not found" failed rows.
3. Related Features
| Feature | Description | Link |
|---|---|---|
| Return List | View, search and manage return orders; the import entry is also here | Go |
| New Return Order | Create a single return order manually — faster than import for a few items | Go |
| Product List | Confirm products exist before importing | Go |